TILE AND GROUT BATHROOM WALLS
The sequence below shows how
to tile around two sides of a bathtub, but the principles can be applied to creating a backsplash around a sink, and other
simple tiling jobs. After the old tile is removed, check the concrete board for any cracks or chips; either
fill in the cracks or replace the concrete board, if necessary.
WHAT YOU NEED
Drop cloths
Masking tape
Wall filler and sandpaper (optional)
Dish detergent and soap or tack cloth
Sponge
Wall paint
Small- or medium-sized paintbrush
Roller and tray
PLAN THE PLACEMENT
PLAN HOW TO ARRANGE the
tiles by propping the first row up against
the wall around the edge of the bathtub. Use whole tiles, placing tile spacers in between, and ascertain
whether these will fill the space. If you
will need to add cut tiles, leave a gap in the corner.
SET THE FIRST TILES
1. APPLY THE ADHESIVE with
a serrated hand trowel. (If the applied adhesive
is flat and smooth, the tiles won’t adhere to it properly.) Work in sections of
approximately 3ft square (1m square) or,
if the area you are tiling is small, apply
adhesive to each tile.
2. STICK THE FIRST ROW of
whole tiles to the wall. Place a tile spacer
between each tile so that the gaps are all
equal.
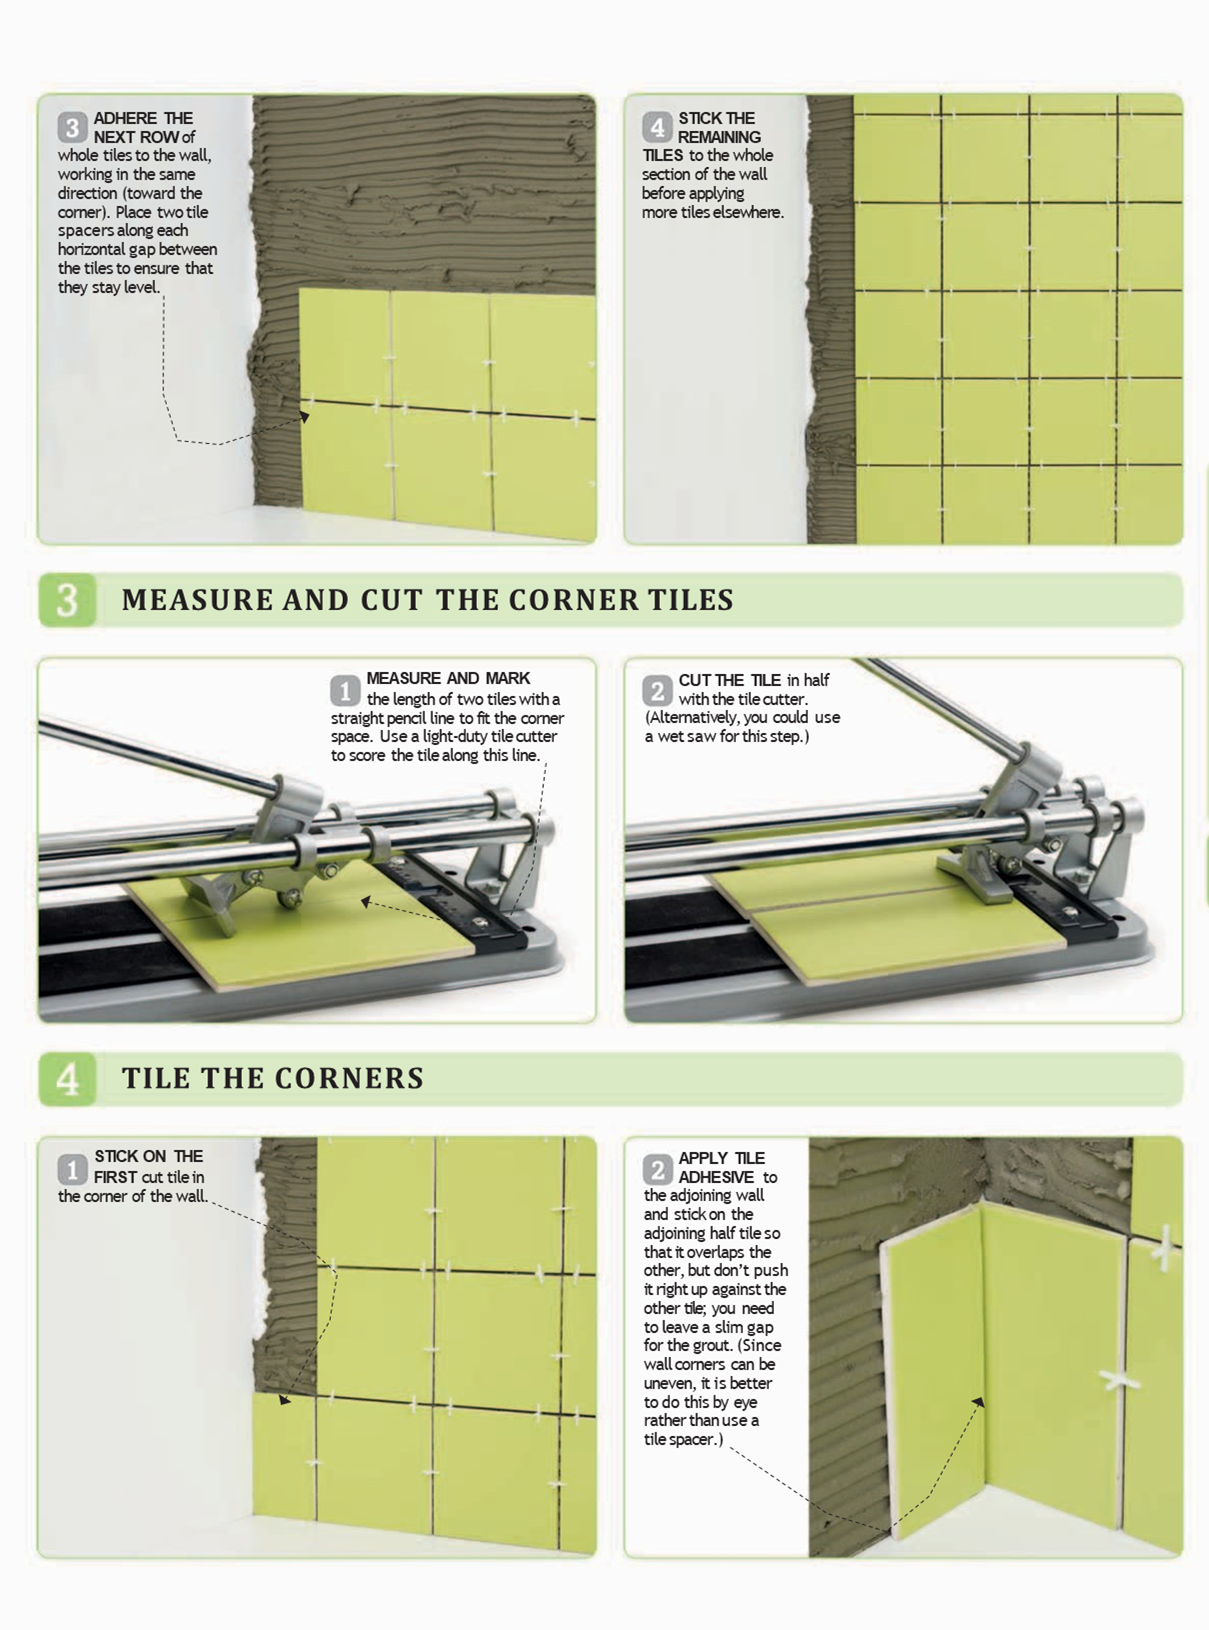
3. ADHERE THE NEXT ROW of whole
tiles to the wall, working in the same direction (toward the corner). Place two tile spacers along each horizontal gap between the tiles to ensure that they stay level.
4. STICK THE REMAINING TILES
to the whole section of the wall before applying more tiles
elsewhere.
MEASURE AND CUT THE CORNER TILES
1. MEASURE AND MARK the
length of two tiles with a straight pencil
line to fit the corner space. Use a light-duty
tile cutter to score the tile along this
line.
2. CUT THE TILE in half with the tile cutter. (Alternatively, you could
use a wet saw for this step.)
TILE THE CORNERS
1. STICK ON THE FIRST
cut tile in the corner of the wall.
2. APPLY TILE ADHESIVE to the adjoining wall and stick on the adjacent half tile so that it overlaps the other, but don’t push it right up against the other tile; you need to leave a slim gap for the grout. (Since wall corners can be uneven, it is better to do this by eye rather than use a tile spacer.)
TILE THE ADJOINING WALL
1. SET A ROW of whole
tiles along the bottom of the adjoining wall, inserting tile spacers between
the tiles.
2. APPLY SOME MORE TILE ADHESIVE
and stick the remaining whole tiles to the wall in ascending rows.
3. MEASURE, CUT, AND STICK
the remaining tiles to the corner area. Then allow the tile adhesive to dry
(see manufacturer’s instructions).
FILL THE GAPS WITH GROUT
1. ONCE THE ADHESIVE IS DRY, remove the
tile spacers. Then load the grout spreader or spatula with grout and spread it in a diagonal direction across the surface of the tiles. Work in small sections (3ft square/1m square), pushing the grout into the gaps and smoothing it down with the spatula.
2. GROUT DRIES QUICKLY, so sponge away any residual grout on the tiles before working on another section. Again, move in a diagonal direction as you wipe down the tiles.
3. SPREAD GROUT evenly
over all the corner tiles using the grout
spreader or spatula.
4. USE A FINGER, if
necessary, to smooth the grout between the
cut tiles in the corner for an even finish.
5. WHEN THE GROUT IS DRY, polish
the tiles with a clean cloth to remove the
last of the excess grout.
SEAL THE BASE OF THE TILES
1. APPLY THE SILICONE SEALANT
evenly around the base of the tiles where they make contact with the edge of the bathtub.
2. USE A WET FINGER to smooth
the silicone out to make it look as neat as possible.


No comments:
Post a Comment